Your dog is home from surgery, tail wagging despite it all, and you’re terrified to let them take a single wrong step. That fear is completely understandable, and you’re not alone in feeling it. Finding safe exercise for your dog after TPLO surgery is one of the most stressful parts of the whole recovery journey, especially when every website seems to offer a different timeline and your lounge room floorboards feel like a disaster waiting to happen.
Here’s the truth: the recovery period after TPLO surgery isn’t just about keeping your mate still. It’s about knowing exactly when to hold back and when to gently push forward, and that balance makes all the difference between a full return to form and a frustrating setback.
This guide is written specifically for dog owners across Gippsland who want a clear, practical path through the weeks ahead. You’ll find a week-by-week walking framework, the red flags that should send you straight back to your vet, and honest advice on keeping an active dog mentally settled while their body does the hard work of healing. Let’s walk through it together.
Key Takeaways
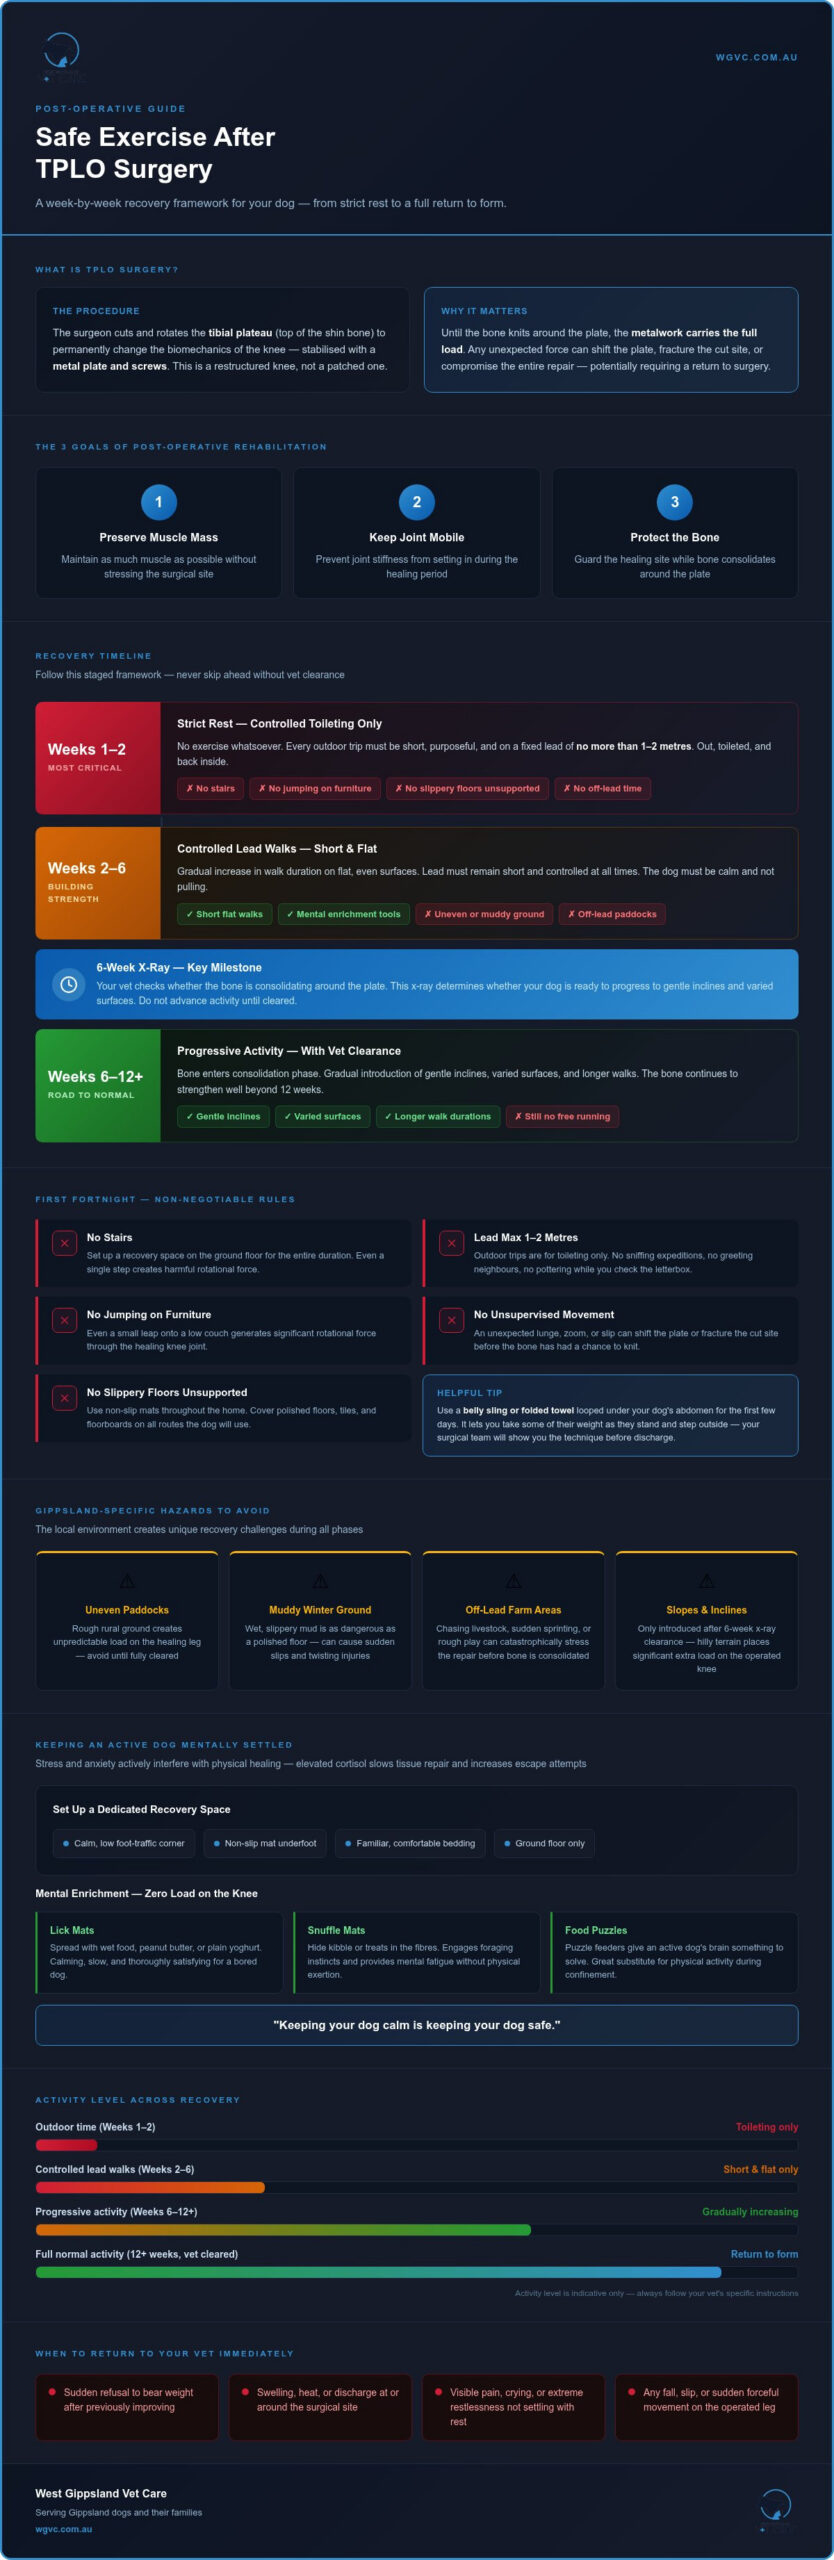
- Safe exercise for your dog after TPLO surgery follows a strict, staged timeline — starting with toilet breaks only and building gradually over 12+ weeks to protect the healing bone and plate.
- The first two weeks are the most critical: slippery floors, stairs, and unsupervised movement are genuine risks that can undo the surgeon’s work before the bone has had a chance to knit.
- Gippsland’s paddocks, uneven ground, and muddy winters create unique hazards during recovery — and this guide explains exactly when and how to navigate them safely.
- The 6-week x-ray is a key milestone that determines whether your dog is ready to progress to gentle inclines and varied surfaces, so knowing what to expect beforehand makes a real difference.
- Keeping an active dog mentally settled during restricted movement is its own challenge — and there are practical, low-effort strategies that work without putting strain on a healing knee.
Understanding TPLO Recovery: Why Controlled Exercise is Critical
To understand why safe exercise for your dog after TPLO surgery requires such careful management, it helps to know what the surgery actually does. A Tibial Plateau Leveling Osteotomy (TPLO) doesn’t simply repair a torn ligament the way you might imagine. Instead, the surgeon cuts and rotates the tibial plateau, the top surface of the shin bone, to change the biomechanics of the knee entirely. The joint is then stabilised with a metal plate and screws. Your dog walks out of surgery with a fundamentally restructured knee, not a patched one.
That distinction matters enormously, because it means the bone itself needs time to knit back together around the plate. Until that happens, the metalwork is carrying the load. An unexpected lunge at the postman, a joyful zoom across the backyard, or even a clumsy slip on a wet floor can place enough force through that healing bone to shift the plate, fracture the cut site, or compromise the entire repair. The consequences aren’t just painful; they can mean a return to the operating table.
Recovery isn’t a straight line, and it isn’t quick. Patience across the first six weeks is genuinely the most important thing you can offer your dog right now.
The Goal of Post-Operative Rehabilitation
Rehabilitation after TPLO surgery has three quiet, steady goals: preserve as much muscle mass as possible without stressing the surgical site, keep the joint gently mobile so it doesn’t stiffen during healing, and protect the bone while it consolidates. That last word is important. Around the six-week mark, the bone enters what’s known as the consolidation phase, where the new bone tissue begins to mineralise and genuinely strengthen around the plate. This is the milestone your vet will be checking for at the post-operative x-ray, and it’s the gateway to progressing your dog’s activity safely.
A Fear-Free Approach to Confinement
Here’s something most recovery guides don’t talk about: stress and anxiety actively interfere with physical healing in dogs. Elevated cortisol levels from distress can slow tissue repair, disrupt sleep, and make a dog more likely to thrash, pace, or attempt to escape confinement, all of which create real physical risk.
This is where a thoughtful home environment makes a genuine difference. Consider setting up a dedicated recovery space, a calm corner with a non-slip mat, familiar bedding, and low foot traffic. Mental enrichment tools like lick mats, snuffle mats, and food puzzles give an active dog’s brain something to do without putting any load through a healing knee. These aren’t just nice extras; they’re part of the recovery plan.
Keeping your dog calm is keeping your dog safe.
The First Fortnight: Strict Rest and Gentle Toileting
The first fourteen days after TPLO surgery are, without question, the most delicate of the entire recovery. Your dog’s body is doing extraordinary work beneath the surface, and the single most valuable thing you can offer during this window is genuine, disciplined rest. Safe exercise for your dog after TPLO surgery doesn’t actually begin in these early weeks. What you’re managing right now isn’t exercise at all. It’s controlled toileting, and the distinction matters.
Every outdoor trip should be short, purposeful, and on a fixed lead of no more than one to two metres. That’s it. No sniffing expeditions around the yard, no greeting the neighbours, no letting them potter while you check the letterbox. Out, toileted, and back inside. The surgical site is still raw, the bone cut is fresh, and the plate is carrying the full load of your dog’s weight with every step.
Inside the house, the rules are equally firm:
- No stairs. If your dog sleeps upstairs, set up a recovery space on the ground floor for the duration.
- No jumping onto furniture. Even a small leap onto a low couch generates significant rotational force through a healing knee.
- No unsupported movement on slippery surfaces. This one deserves its own section, because it’s the risk most Gippsland homes aren’t prepared for.
For the first few days especially, a belly sling or folded towel looped under your dog’s abdomen is genuinely useful. It lets you take some of their weight as they stand and step outside, reducing the load on the operated leg while they find their footing. Your surgical team will show you the technique before discharge, but the principle is simple: support, don’t carry.
Keep a close eye on the incision site each day. You’re looking for any increase in redness, warmth, swelling, or discharge. A small amount of bruising and mild swelling in the first 48 hours is normal. What’s not normal is discharge that’s cloudy or has an odour, skin that looks tight and shiny around the wound, or a dog that’s suddenly more reluctant to bear weight than they were the day before. If you notice any of these, contact your orthopaedic vet Gippsland promptly rather than waiting for the next scheduled check.
Managing the ‘Slippery Floor’ Risk in Gippsland Homes
Polished floorboards and ceramic tiles are beautiful until your post-op dog takes one sliding step and puts everything at risk. Hardwood floors are common across older Gippsland homes, and the combination of a dog compensating for a sore leg and a smooth surface is genuinely dangerous. Lay non-slip runners through every hallway and transition point your dog will use, and place yoga mats or rubber-backed rugs at the base of any steps, near the back door, and beside their sleeping area. Grip matters more than aesthetics right now. A belly sling is also invaluable for navigating the back verandah step, where even a single uncontrolled push-off can jar the surgical site.
This safety mindset should extend to the garden as well; keeping concrete paths and timber decks free from moss and grime is crucial for stability. A professional exterior clean by Gutter Wiz can restore traction to these surfaces, providing a much safer environment for your dog’s essential outdoor trips during their recovery.
Signs Your Dog is Overdoing It
There’s a meaningful difference between toe-touch lameness, where your dog briefly touches their foot to the ground with each step but doesn’t fully weight it, and non-weight bearing lameness, where the leg is held completely off the ground. Some toe-touch lameness in the first week is expected. Non-weight bearing after the first 48 to 72 hours, or a sudden return to non-weight bearing after your dog was starting to use the leg, warrants a call to your vet.
In the first week, a wrapped ice pack applied gently to the knee for ten to fifteen minutes after toileting trips can help manage localised inflammation. Wrap it in a thin cloth first, never apply ice directly to skin or a fresh incision, and keep your dog calm and still during the application. It’s a small step, but it supports the body’s natural healing process during the days when swelling is at its peak.
Weeks Two to Six: Building Strength with Controlled Lead Walks
Once the first fortnight has passed and your vet has given you the nod to progress, the real work of rebuilding begins. Safe exercise for your dog after TPLO surgery during this phase isn’t about getting your dog back to their old routine quickly. It’s about earning each small step forward without losing the ground you’ve already gained.
Start with five minutes of lead walking, three to four times a day, on flat and even ground. That’s it to begin with. If your dog completes those walks without limping and shows no increased swelling or reluctance the following morning, you can add five minutes to each session the next week. The rule is simple: progress only when the body is clearly ready, not when you think it should be.
One piece of equipment to retire immediately: the retractable lead. It has no place in TPLO recovery. A retractable lead gives your dog the freedom to lunge, bolt, or change direction without warning, and a single sudden jerk at the end of the line is all it takes to compromise a healing bone. Use a fixed lead of one to two metres for the entire six-week period, kept short and under your control at all times.
Walk slowly. Deliberately. The goal is to encourage your dog to place each paw with intention, which promotes correct weight distribution through the operated leg and begins rebuilding the neuromuscular patterns the joint needs to function properly. If your dog is rushing ahead, slow yourself down. Their pace should follow yours.
The Transition to Weight-Bearing Exercise
If your dog is consistently holding the operated leg off the ground during walks, that’s a clear signal to rest rather than push through. Some toe-touch lameness is expected early in this phase, but three-legged walking suggests the joint is under more stress than it can comfortably manage right now. Scale back to shorter, quieter outings and check in with your vet before progressing again.
In the lounge room, gentle weight-shifting exercises can help. Stand your dog on a non-slip surface, place a hand lightly on their hip, and apply gentle sideways pressure to encourage them to shift weight onto the operated leg and hold it briefly. A few repetitions is plenty. You’re not building strength yet; you’re reminding the body how to bear load.
It’s also worth knowing that a sniffing break is cognitively demanding for a dog and can be just as tiring as the walk itself, which means a few minutes of nose-work at a stationary spot can help settle an active dog without adding physical strain to a healing knee.
Maintaining a Low-Impact Lifestyle
The doorbell is one of the biggest hazards in a recovering dog’s day. That instinctive dash to the front door, the excited spin, the jump at the handle: it happens in seconds and puts enormous rotational force through the knee. Managing your dog’s environment means anticipating these triggers. Keep them in a separate room during deliveries, use a baby gate across the hallway, and ask visitors to knock quietly rather than ring.
Keeping your dog at a healthy weight during recovery is genuinely important. Every extra kilogram adds load to the surgical site with every step, and dogs on restricted exercise are at real risk of gaining weight quickly if their food intake isn’t adjusted to match their reduced activity. Talk to your vet about appropriate portions during the recovery period.
The six-week x-ray is a milestone worth preparing for emotionally as well as practically. For many dogs, a vet visit after surgery carries some anxiety, and that stress can make the appointment harder for everyone. At West Gippsland Vet Care, the fear-free veterinary care approach is built into every follow-up consultation, so your dog’s comfort during that crucial check isn’t an afterthought. It’s part of how we work. The x-ray findings at this appointment will determine whether your dog is ready to progress to the next phase, and having a calm, settled dog makes for a much clearer picture, in every sense.
Navigating the Gippsland Environment During Recovery
Living in Gippsland is genuinely beautiful, but it presents a set of recovery challenges that no generic post-op guide will ever mention. The rolling paddocks, the heavy winter mud, the wildlife that appears without warning along a quiet back road: these are the realities of rural and semi-rural life here, and they matter enormously when you’re trying to keep a healing dog safe. Safe exercise for your dog after TPLO surgery looks quite different in Neerim South or Hill End than it does in a suburban Melbourne backyard, and that difference deserves honest, practical attention.
Paddock Management and Uneven Terrain
Before the twelve-week mark, a paddock is not a safe exercise space. Full stop. What looks like a flat grassy area is almost always hiding shallow dips, dried hoofprints, wombat scrapes, and soft patches where the ground gives unexpectedly underfoot. For a dog compensating on a healing leg, a single misstep into a hidden hollow generates exactly the kind of sudden rotational force the surgical site cannot handle right now.
A manicured lawn, even a modest one, is significantly safer for early rehabilitation walks. The surface is predictable, the footing is consistent, and you can see what’s coming. If outdoor space is limited and you want to give your dog some fresh air beyond a short lead walk, consider setting up a small confinement pen on a flat, firm section of ground. A temporary exercise pen gives your dog a change of scenery and a chance to sniff the air without any risk of bolting after a rabbit or taking off across uneven ground.
Keeping the Incision Clean in Rural Areas
Gippsland winters are wet, and that creates a genuine wound-care challenge. Mud, damp grass, and puddles all carry bacteria that can introduce infection to a healing incision, particularly in the first six weeks when the skin closure is still consolidating. A medical boot or a simple plastic bag secured loosely over the paw and lower leg with a bandage cover can protect the site during short outdoor trips. Remove it immediately on return and never leave it on indoors, as trapped moisture is its own problem.
When you come back inside, dry the leg gently with a soft towel using a patting motion rather than rubbing. Rubbing creates friction and heat near the scar tissue, which can cause irritation. Never allow your dog to lick the leg clean after being outside. Their instinct is to groom away the unfamiliar smell, but a dog’s mouth introduces bacteria directly to the wound. If licking is a persistent issue, a well-fitted recovery collar or medical suit worn during and after outdoor trips is your most reliable solution.
Local distractions deserve a mention too. A kangaroo clearing a fence line or cattle moving along an adjoining paddock can trigger a lunge response in even the most settled dog, and that split-second reaction is one of the most common causes of setbacks during lead walks in rural areas. Keep walks away from fence lines where stock are active, choose quieter times of day, and always use a fixed, short lead that keeps your dog close enough to manage.
Cold overnight temperatures in the hills around Neerim South and Hill End can also stiffen a healing joint, making the first steps of the morning more uncomfortable and the risk of awkward movement slightly higher. A light dog coat worn overnight and a gentle warm-up period before any morning walk can help the joint move more freely before you head outside.
If you have questions about wound care specific to your property or environment, the team at West Gippsland Vet Care understands the local conditions and can help you adapt the recovery plan to what your dog’s day actually looks like.
Weeks 6 to 12+: The Road Back to ‘Normal’ Life
The six-week x-ray is the moment most dog owners have been quietly counting down to, and for good reason. This appointment isn’t just a routine check. It’s the point where your vet can see, on imaging, whether the bone is consolidating as expected around the surgical plate. If the x-ray shows good bone union, you’ll receive the green light to begin progressing activity in a meaningful way. If healing is tracking more slowly, the timeline simply extends. Either outcome is useful information, and neither is a failure.
With a positive x-ray result, the weeks between six and twelve open up carefully. Gentle inclines can be introduced on lead walks, short grassy slopes rather than steep paddock rises. Soft sand and short grass are also excellent surfaces at this stage, offering slightly varied footing that begins to challenge the joint’s stability without the unpredictability of rough terrain. Walk durations can increase gradually, always using the same guiding principle from earlier in recovery: progress only when the previous level has been handled comfortably for several consecutive days.
Off-lead time is still restricted until at least weeks twelve to sixteen, even when your dog looks and feels like their old self. The bone may be consolidating well, but the surrounding muscle, ligament, and soft tissue continue to remodel for months after surgery. A dog that feels great will often move faster than their body is genuinely ready for, and that gap between perceived fitness and actual tissue strength is where setbacks happen.
Long-term joint health is also worth thinking about from this point forward. TPLO surgery addresses the mechanical instability, but the affected knee will carry some degree of arthritis risk over time. Joint supplements containing omega-3 fatty acids and glucosamine are commonly discussed with owners at follow-up appointments, and your vet is the right person to advise on what’s appropriate for your dog’s size, age, and overall health picture. Weight management remains important indefinitely, not just during the acute recovery phase.
Gradual Return to Off-Lead Activity
When off-lead time does begin, start in a small, securely fenced area where you can control the environment. Five minutes of free movement per session is a sensible starting point. Watch how your dog moves, how they land, whether they’re favouring the leg. Ball throwing and frisbee should stay off the agenda for several months beyond week twelve, because the explosive acceleration, sudden stops, and airborne landings involved place enormous rotational force through a knee that’s still building its long-term resilience. For working or farm dogs, a return to full property work requires an honest conversation with your vet about what that actually involves day to day.
How WGVC Supports Your Mate’s Long-Term Health
Safe exercise for your dog after TPLO surgery is a months-long commitment, and having the right team alongside you makes a genuine difference. At West Gippsland Vet Care, dog surgery recovery is supported through structured follow-up care, with the same surgical team available to answer questions as your dog’s rehabilitation progresses. In-house diagnostic imaging means bone union can be assessed right here in the region, without sending your dog elsewhere for imaging and waiting on results. And for existing clients in the Warragul area, 24-hour emergency support is available if something unexpected happens between scheduled appointments. That kind of local continuity of care, from surgery through to the final stages of recovery, is what makes the long road back to normal feel a little less daunting.
Your Dog’s Best Recovery Starts with the Right Support
The road back from TPLO surgery is long, but it’s genuinely manageable when you know what each phase is asking of you. Safe exercise for your dog after TPLO surgery isn’t about doing less; it’s about doing the right things at the right time, from those careful first toilet trips to the moment you finally watch your mate trot off-lead again with confidence.
Three things will carry you through: patience with the timeline, attention to your dog’s daily signals, and a local team you can call when something doesn’t feel right. That last one matters more than most guides acknowledge.
At West Gippsland Vet Care, we’re an independent Gippsland-owned practice with a specialised orthopaedic surgical suite right here in Warragul, and 24-hour emergency support available to all our surgical patients. You don’t have to navigate this alone, and you don’t have to travel far for the care your dog deserves.
Book a post-op consultation or talk to our team about TPLO surgery today. Your dog worked hard to get through surgery; now let’s get them all the way home.
Frequently Asked Questions About Safe Exercise for Your Dog After TPLO Surgery
How long does a dog need to be confined after TPLO surgery?
Full confinement, meaning no free roaming and no unsupervised movement, is typically required for the first six weeks after TPLO surgery. After the six-week x-ray confirms good bone consolidation, activity can begin increasing gradually over the following six to twelve weeks. Most dogs aren’t considered fully recovered until around the four to six month mark, though this varies depending on age, size, and how healing progresses.
Confinement doesn’t mean your dog needs to be crated around the clock. A calm, gated recovery space with non-slip surfaces, mental enrichment, and regular short lead walks gives them structure without the isolation that can increase anxiety and make confinement harder to manage.
Can my dog go up and down stairs after TPLO?
Stairs should be completely off limits for the first six weeks, and ideally longer. Each step requires your dog to push off and absorb load through the operated leg in ways that flat walking simply doesn’t, and that force is significant enough to stress the healing bone. Set up your dog’s sleeping and resting space on a single level before they come home from surgery so there’s no temptation or necessity to use stairs at all.
After the six-week x-ray, your vet will advise whether gentle stair use can resume. Even then, going slowly and keeping the lead on for support is sensible. If your home layout makes stairs unavoidable, ask your vet team about using a belly sling to assist on the steps during the early weeks.
What should I do if my dog slips or jumps during recovery?
Stay calm first, then assess. Watch how your dog lands and whether they immediately bear weight on the operated leg. A single slip on a smooth floor that your dog recovers from without obvious distress often doesn’t cause lasting damage, but it’s still worth monitoring closely for the next 24 to 48 hours. Look for increased swelling, sudden reluctance to weight bear, or visible pain when the leg is gently touched.
If your dog has jumped from height, landed awkwardly, or is suddenly holding the leg completely off the ground after a slip, contact your vet promptly rather than waiting to see how things settle. These incidents are exactly why non-slip runners, baby gates, and short fixed leads matter so much throughout recovery.
When can my dog go for a walk on the lead?
Short lead walks typically begin around the two-week mark, once the initial incision healing is underway and your vet has cleared you to progress. Safe exercise for your dog after TPLO surgery at this stage means five minutes per session, three to four times a day, on flat and even ground with a fixed lead of one to two metres. That’s genuinely the starting point, not a warm-up to something longer.
Duration increases slowly over the following weeks, guided by how your dog responds each day. If there’s increased swelling, stiffness the morning after a walk, or more pronounced limping, that’s a clear signal to scale back rather than push through. Progress is earned by the body, not by the calendar.
Is it normal for my dog to still be limping four weeks after surgery?
Some degree of limping at four weeks is common and doesn’t automatically signal a problem. Most dogs show toe-touch lameness throughout the early weeks as the bone heals and surrounding soft tissue recovers. What matters is the direction of travel: your dog should be gradually using the leg more, not less, as the weeks progress.
If your dog is still fully non-weight bearing at four weeks, or if limping that was improving has suddenly worsened, that warrants a vet check before the scheduled six-week appointment. Occasionally, swelling, a minor infection, or discomfort from the plate can slow progress and benefit from early attention rather than watchful waiting.
How do I keep my dog calm during TPLO recovery without exercise?
Mental enrichment is your most reliable tool. Lick mats, snuffle mats, food puzzles, and frozen Kongs give an active dog’s brain genuine work to do without placing any load through the healing knee. Scatter feeding on a non-slip mat, short training sessions using only sit and drop commands, and calm one-on-one time with you all help reduce the restlessness that comes with restricted movement.
For those looking for more structured ways to keep their mate engaged without physical strain, resources from professional pet care providers like H&H Dog offer excellent guidance on calm enrichment and gentle management that can be adapted for any dog in recovery.
Keeping your dog’s environment predictable and low-stimulation also makes a real difference. Doorbell sounds, visiting children, and other pets moving freely around the recovery space can spike arousal quickly. A quiet, gated area away from household traffic gives your dog the best chance of staying settled, which actively supports the physical healing process.
Can I leave my dog alone during the first week of recovery?
Short periods alone are generally manageable if your dog is safely confined in a gated recovery space with non-slip flooring, water within easy reach, and no opportunity to jump or climb. The risk of leaving a post-op dog unsupervised isn’t just about what they do intentionally; it’s about the unexpected stumble, the startled response to a noise outside, or the determined attempt to reach a favourite spot on the couch.
In the first week especially, try to arrange for someone to be home as much as possible. If that’s not realistic, a pet camera lets you monitor remotely, and keeping the recovery space genuinely escape-proof reduces the risk significantly. Talk to your vet about appropriate pain management during this period too, as a comfortable dog is a calmer, safer dog when left briefly alone.
When can my dog go back to the beach or an off-lead park?
Off-lead environments, including beaches and dog parks, are generally off the agenda until at least weeks twelve to sixteen, and only after your vet has confirmed that bone healing is progressing well. Soft sand can actually be a useful rehabilitation surface in controlled, on-lead sessions from around weeks six to eight, but the uncontrolled running, sudden direction changes, and social excitement of a busy beach or park make these environments genuinely risky until much later in recovery.
When off-lead time does resume, start in a small, securely fenced area rather than an open park, and keep sessions short. Ball throwing, fetch, and high-speed play should wait several months beyond the twelve-week mark. The goal is a full, lasting recovery, and that’s far more likely when the return to normal life is gradual rather than rushed.